System accidents
Opinions, among other things, that someone decided were worth putting online.
[homepage][blog][[email protected]][RSS] (the “RSS” feed is actually in Atom format)
Transferring files using netcat
Today, we’re going to make enemies of both the IT and Security departments. Today, we transfer sensitive files out of our work laptop using netcat.
![]()
Okay, I swear I’m not really trying to spawn security alerts for the organization, but really I had very little choice. I’m just trying to reimburse these phone and internet bills, but it’s almost like the company doesn’t want me to: I can’t plug flash drives into my work laptop; I don’t want to send semi-sensitive information over email, access to various file-sharing services has been blocked, I don’t want to use my personal passwords on my work laptop, and I don’t have a NAS setup yet. So, you can see, this is just the fastest option for me.
First, a disclaimer, this method of copying files is not secure. Verification of received data is outside the scope of this guide, and there is no guarantee that your sent data will ever reach the target. This should be done sparingly on trusted networks only.
Another disclaimer, this guide provides a lot of explanation for a very small subet of netcat’s full capabilities. Additionally, all examples are derived from netcat’s man pages, just with more explanations (I added the bits on encryption). For more information about netcat, feel free to check the netcat reference guide.
For this exercise, we’ll need some things:
- Two computers, both with nmap’s version of netcat installed. It can be installed as the
nccommand. Due to licensing issues, the version of netcat that comes with Mac is the exceptionally outdated GNU netcat. - (Optional) Network connectivity to pull public pgp keyring on one laptop. Only necessary if you want to encrypt the data you’re sending.
- (Optional) Corresponding private pgp keyring on the other laptop, if you want to decrypt any encrypted data.
- Modern shell on both laptops like bash or zsh.
We’ll call the first computer listener as it will be listening and waiting for a while. The second computer will be called sender as it will be sending a file.
First, let’s gather the private listening address of the listener. This might be the address leased by the listener from an upstream DHCP server. You can usually find this address using ip addr command.
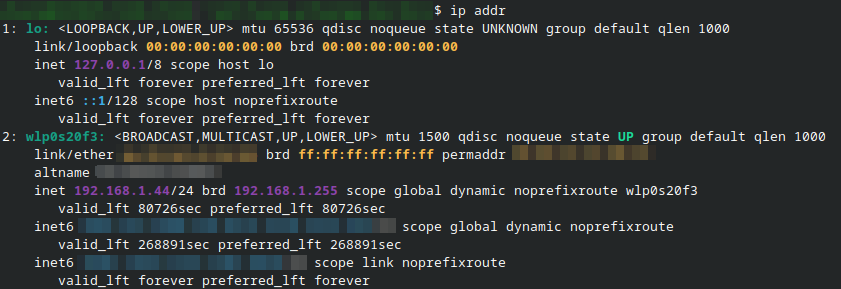
So my listener’s address is currently 192.168.1.44 in this network. I’m going to do the file transfer through an intermediate node so that it’s easier for me to screen record; we’ll call the node proxy. You can omit the proxy and modify the command used by the sender to use the IP of the listener. The listener and the sender in my experiment are both running on 192.168.1.44. But the transfer itself will go through the proxy at 192.168.1.27.
graph LR
A["`Sender (<ins>192.168.1.**44**</ins>)
*nc 192.168.1.27 9899 < in*`"] --> B
B("`Proxy (<ins>192.168.1.**27**</ins>)
*nc -l 9899 | nc 192.168.1.44*`")
B --> C["`Listener (<ins>192.168.1.**44**</ins>)
*nc -l 9899 > out*`"]
And here’s the results
We can encrypt the content if we want. gpg also supports symmetric encryption using a passphrase with the --symmetric option, so we don’t need a pgp key to encrypt any data.
%%{ init: { "flowchart": { "markdownAutoWrap": "false", "wrappingWidth": "1980" } } }%%
graph TD
A["Sender (<ins>192.168.1.**44**</ins>)

*nc 192.168.1.27 9899 < <( gpg --output - --recipient [email protected] --encrypt in )*"] --> B
B("Proxy (<ins>192.168.1.**27**</ins>)
*nc -l 9899 | nc 192.168.1.44*")
B --> C["Listener (<ins>192.168.1.**44**</ins>)
*nc -l 9899 > out.gpg && gpg --output out --decrypt out.gpg*"]
As previously mentioned, this method should be used sparingly, as it’s not really a safe or convenient way to transfer files, but at least my work laptop can receive phone bills from my personal computer now.